Beginners should know that the WordPress Admin, or simply WordPress dashboard, is the central control panel where you manage and customize your WordPress website.
The WordPress admin dashboard, often called WP Admin or WP admin panel, controls your entire WordPress website.
It’s where you create and manage content, add functionality through plugins, change styling through themes, and much more.
Therefore, it also provides access to various tools, settings, and features that allow you to create and manage your WordPress site’s content, appearance, functionality, and more.
Table of Contents
Principal components and functionalities of the WordPress Admin

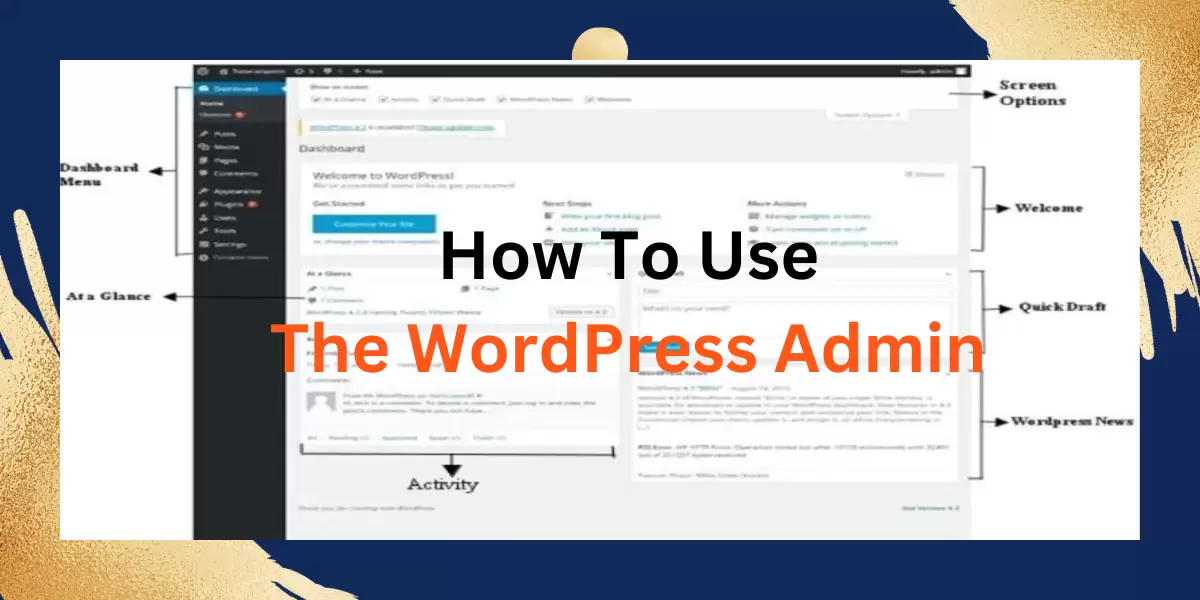
1. WordPress Admin Bar
Located at the top of the screen (visible when logged in as an administrator), the admin bar provides quick access to essential features, including adding new content, managing comments, accessing the Customizer, and viewing your site.
2. Sidebar Menu
The left sidebar menu consists of various sections and options for managing different aspects of your website.
The sections may vary slightly depending on your theme, installed plugins, and user role, but the core sections typically include the following:
- Dashboard: The main overview of your site, displaying essential information such as recent activity, site stats, and quick drafts for newly created posts.
- Posts: Create, edit, and manage blog posts or articles.
- Media: Upload, organize, and manage media files (images, videos, documents).
- Pages: Create, edit, and manage static pages (such as About Us, Contact Us, Privacy Policy, Terms and Conditions, etc.).
- Comments: Moderately reply to comments left on your site. But comments can be turned off depending on the admin’s choice.
- Appearance: Customize the visual appearance of your WordPress website and manage themes, menus, widgets, and the site’s header and background.
- Plugins: Here, you can Install, activate, deactivate, and manage plugins to extend the functionality of your WordPress website. The plugin has three components: Installed Plugins, Add New and Plugin Editor.
- Users: Manage user accounts, roles, and permissions for your WordPress website.
- Tools: Access various tools and features, including import/export options, site health, and other site management utilities.
- Settings: Configure general site settings, reading settings, writing settings, and more.
- Update: The update bar shows notifications if there is any software in the system that needs to be updated
3. Welcome Dashboard
When you first log in to a fresh WordPress installation or after significant updates, you may see a welcome dashboard providing essential information and guiding you through initial setup steps.
4. Quick Draft
The Quick Draft widget is in the dashboard’s central section. It lets you quickly write and save draft posts without leaving the dashboard.
5. Activity
The activity section overviews recent site activity, including new comments, published posts, and updates from installed plugins.
6. Notifications
WordPress displays notifications about updates, important news, and other relevant information in the top right corner of the dashboard.
7. Screen Options
The Screen Options tab in the top right corner allows you to customize the dashboard’s appearance by showing or hiding certain widgets and elements according to your preferences.
As you see above, the WordPress dashboard is a centralized hub for managing all aspects of your website.
It provides an intuitive and user-friendly interface that allows you to create and organize content, control site settings, install plugins, customize the appearance, and perform various administrative tasks.
Familiarizing yourself with the dashboard’s components and functionalities will empower you to manage and customize your WordPress site efficiently.
WordPress Admin: Customizing General Settings
Customizing the general settings in WordPress allows you to configure essential aspects of your website, such as site title, tagline, permalink structure, time zone, and more.
Here are some unique clues and steps to customize the general settings:
1. Accessing General Settings
Log in to your WordPress dashboard as an administrator. From the sidebar menu, navigate to “Settings” and click “General.” This will take you to the General Settings page.
2. Site Title and Tagline
The site title is the name of your website, while the tagline is a brief description or slogan.
Enter your desired site title (e.g., TheWPSkill) and tagline (e.g., Free Resources Related to WordPress) in the respective fields. These will appear on your site, such as the header or browser title.
3. WordPress Address (URL) and Site Address (URL)
These fields define the web addresses of your WordPress installation.
You don’t need to change these in most cases unless you move your site to a different domain or directory.
4. Email Address
Enter your email address in this field. WordPress will use this email to send you important notifications and password reset requests.
5. Membership
Turn the “Anyone on or off can register” option based on whether you want to allow user registration on your site.
Enabling this option allows visitors to register as subscribers and potentially contribute to your site.
6. Timezone
Choose the appropriate timezone for your site from the dropdown menu. This ensures that time-based features function correctly, such as scheduled posts or event calendars.
7. Date and Time format
Select your preferred format for displaying dates and times on your site.
WordPress provides various predefined formats, or you can create a custom format using the available format characters.
8. Week Start On
Choose the starting day of the week according to your region or preference.
This setting affects the display of the WordPress calendar and other date-related functionalities.
9. Site Language
Select the language in which you want to use the WordPress dashboard.
This affects the language of the admin interface, but it doesn’t automatically translate the content on your site.
10. Permalinks Structure
Permalinks determine the structure of your post and page URLs.
Click on the “Permalinks” tab within the “Settings” menu to customize the permalink structure.
Choose one of the predefined structures or create a custom structure using available tags.
11. Save Changes
After making the desired modifications to the general settings, scroll to the bottom of the page and click the “Save Changes” button to save your settings.
As explained above, customizing the general settings allows you to personalize your website’s branding, ensure accurate time display, configure permalink structure for better SEO, and set up basic site functionality.
Review and update these settings whenever necessary to align with your website’s requirements and goals.
Exploring Themes On WordPress Admin

Themes are essential elements in WordPress that allow you to customize the appearance and extend the functionality of your website.
Explore themes in more detail: Themes determine your WordPress website’s look and feel.
They control the design, layout, color scheme, typography, and other visual elements.
Let’s explain in detail what you need to know about themes:
1. Accessing Themes
Go to “Appearance” in the sidebar menu of the WordPress dashboard and click “Themes.” This will take you to the Themes page, where you can manage your installed themes.
2. Installing Themes
You can install themes from the WordPress Theme Directory, where thousands of free themes are available.
Click the “Add New” button to search for themes, preview them, and install the desired theme directly from the directory.
You can also upload premium themes that you’ve obtained from trusted third-party sources in ZIP format.
3. Activating Themes
Once a theme is installed, you can activate it by clicking the “Activate” button. Activating a new theme will change your website’s appearance based on the chosen theme’s design and layout.
4. Customizing Themes
Many themes offer customization options through the WordPress Customizer. You can access the Customizer by clicking ” Customize ” in the “Appearance” menu.
From there, you can modify various aspects of your theme, such as colors, header images, site titles, menus, and more.
5. Child Themes
Creating a child theme is recommended if you want to modify a theme without affecting its original code.
A child theme inherits the functionality and styling of its parent theme while allowing you to make customizations safely.
Exploring Plugins On WordPress Admin

Plugins add specific features and functionality to your WordPress website. They enhance the capabilities of your site and allow you to extend its functionality without coding.
Let’s explain Plugins and what you need to know:
1. Accessing Plugins
From the WordPress dashboard, go to “Plugins” in the sidebar menu and click “Installed Plugins.” This page displays the plugins you have installed on your site.
2. Installing Plugins
You can install plugins from the WordPress Plugin Directory or upload them manually.
To install a plugin from the directory, click on the “Add New” button, search for the desired plugin, and click on “Install Now” to install it.
To upload a plugin manually, click on the “Upload Plugin” button and select the plugin ZIP file from your computer.
3. Activating and Deactivating Plugins
After installing a plugin, you must activate it to use its features. To activate a plugin, go to the “Installed Plugins” page, find the plugin, and click on the “Activate” link.
So, if you want to disable a plugin temporarily, you can deactivate it by clicking on the “Deactivate” link.
4. Managing Plugins
From the “Installed Plugins” page, you can activate, deactivate, update, and delete plugins. Depending on the plugin, you can access specific settings and documentation.
5. Recommended Plugins
Depending on your website’s purpose, various recommended plugins are available for specific functionalities like SEO optimization, security, caching, contact forms, e-commerce, and more.
Therefore, You can search for recommended plugins or consult plugin reviews and recommendations from trusted sources.
As explained above, Themes and plugins play a significant role in shaping your WordPress website.
They provide flexibility, customization options, and enhanced functionality. When choosing themes and plugins, consider compatibility, ratings, reviews, and support to ensure they align with your website’s requirements and goals.
WordPress Admin: Creating and Managing Posts
Creating and managing posts in WordPress is fundamental to managing a blog or publishing content on your WordPress website.
Here’s a step-by-step guide to creating and managing posts:
1. On WordPress Admin, Creating a New Post
- From the WordPress dashboard, navigate to “Posts” in the sidebar menu and click “Add New.”
- Enter a title for your post in the provided field.
- Write your content using the visual editor or the text editor. The visual editor allows you to format your text, add media, and apply styles without coding knowledge.
- You can add media (images, videos, audio) to your post by clicking the “Add Media” button.
- Format your content using headings, paragraphs, bullet points, etc.
- Utilize the toolbar above the editor to customize the appearance of your text, insert links, add images, and more.
- If needed, set a featured image by clicking the “Set featured image” link in the sidebar and uploading/selecting an image.
- Categories and Tags: Assign appropriate categories and tags to your post. Categories help organize your content into topics, while tags provide additional descriptors. You can create new categories and tags right from the post editor.
- Save your draft periodically using the “Save Draft” button to prevent data loss.
2. Managing Posts
- All Posts: To view and manage all your existing posts, click “Posts” in the sidebar menu and click “All Posts.” This page lists all your published, scheduled, and draft posts.
- Edit Posts: Hover over a specific post title and click the “Edit” link to change the post’s content, title, categories, tags, featured image, and more.
- Trash and Delete: In the “All Posts” view, you can move a post to the trash by clicking on the “Trash” link below the post title. To permanently delete a post, hover over it in the trash and click the “Delete Permanently” link.
- Status and Visibility: In the post editor, you can control the status and visibility of your post. You can set it as a draft, schedule it for a future date, make it private, or publish it immediately.
- Preview: To preview how your post will appear on the live site, click the “Preview” button. This lets you see any formatting, styling, or layout changes before publishing.
- Revisions: WordPress automatically saves revisions of your post as you make changes. Click the “Revisions” link in the post editor to view and restore previous revisions.
3. Categories and Tags Management
- To create, edit, or delete categories and tags, go to “Posts” in the sidebar menu and click on “Categories” or “Tags” respectively.
- Enter a name, slug (optional), and description (optional) to add new categories or tags.
- Assigning Categories and Tags: You can assign categories and tags from the right sidebar while creating or editing a post. Select the appropriate categories and tags from the available options.
So, by following these steps, you can create new posts, manage existing ones, and organize your content effectively using categories and tags.
Regularly updating and maintaining your posts ensures fresh and engaging content on your WordPress website.
Creating and Managing Pages
Creating and managing pages in WordPress allows you to create static content like About Us, Contact, Services, and other important information that doesn’t change frequently.
Here’s a step-by-step guide to creating and managing pages:
1. Creating a New Page
- From the WordPress dashboard, navigate to “Pages” in the sidebar menu and click “Add New.”
- Write your content using the visual editor or the text editor. The visual editor allows you to format your text, add media, and apply styles without coding knowledge.
- You can add media (images, videos, audio) to your page by clicking the “Add Media” button.
- Format your content using headings, paragraphs, bullet points, etc.
- Utilize the toolbar above the editor to customize the appearance of your text, insert links, add images, and more.
- If needed, set a featured image by clicking the “Set featured image” link in the sidebar and uploading/selecting an image.
- Publish or Save Draft: Once you’re done creating the page, you can either publish it immediately by clicking the “Publish” button or save it as a draft for further editing.
2. Managing Pages
- All Pages: To view and manage all your existing pages, click “Pages” in the sidebar menu and click “All Pages.” This page lists all your published, scheduled, and draft pages.
- Edit Pages: Hover over a specific page title and click the “Edit” link to change the page’s content, title, featured image, and more.
- Trash and Delete: In the “All Pages” view, you can move a page to the trash by clicking on the “Trash” link below the page title. To permanently delete a page, hover over it in the trash and click the “Delete Permanently” link.
- Page Attributes: In the page editor, you can specify various attributes for your page, such as the page template (if available), parent page (to create a hierarchical structure),
and the order in which the page appears in the navigation menus. - Revisions: WordPress automatically saves revisions of your page as you make changes. Click the “Revisions” link in the page editor to view and restore previous revisions.
- Page Templates: Some themes offer page templates with unique layouts or functionality. Select a page template from the “Page Attributes” section if your theme supports it.
3. Menu Management
- To include your pages in your website’s navigation menu, click “Appearance” in the sidebar menu and click “Menus.”
- Create a new menu by clicking the “Create a new menu” link and giving it a name.
- Add pages to the menu by checking the corresponding boxes following the pages you want to include and clicking the “Add to Menu” button.
- Arrange the order of menu items by dragging and dropping them into the desired position.
- Save the menu, which will be used as your primary navigation menu.
Now, you can create new pages, manage existing ones, and effectively organize your WordPress website’s content. Pages provide static and essential information, and handling them properly ensures a well-structured and user-friendly website.
Categories and Tags
Categories and tags are taxonomy features in WordPress that help organize and classify your content. They allow you to group related posts and improve your website’s navigation and discoverability.
Here’s an explanation of categories and tags in WordPress:
Categories On WordPress Admin
Categories are a hierarchical taxonomy in WordPress that groups posts into broad topics or sections.
They allow you to create a structured organization for your content.
Here are critical points about categories:
- Hierarchical Structure: Categories can be organized in a hierarchical structure, meaning you can have parent and child categories. For example, if you have a blog about recipes, you might have parent categories like “Breakfast,” “Lunch,” and “Dinner.” Under each of those, you could have child categories like “Healthy,” “Quick and Easy,” or “Vegetarian.
- Organization and Navigation: Categories help visitors navigate your website by providing a clear and logical structure. They often appear as menu items or part of the post metadata, allowing users to browse posts within specific categories.
- Primary Classification: When creating a new post, you can assign it to one or multiple categories that best represent its topic or subject matter. Assigning a post to a category helps maintain a consistent structure and makes it easier for users to find relevant content.
- Category Pages: Each category you create in WordPress automatically generates a category page that lists all the posts assigned to that category. This page can be customized using category templates or page builders to display category-specific content or layouts.
Tags On WordPress Admin
Tags are a non-hierarchical taxonomy in WordPress that provides additional descriptors and keywords to posts. They offer a way to further classify and organize your content beyond categories.
Here are critical points about tags:
- Non-Hierarchical Structure: Unlike categories, tags don’t have a hierarchical structure. They are standalone keywords or descriptors that you can assign to posts.
- Specific Descriptors: Tags are typically used to describe particular topics, subjects, or attributes related to a post. For example, if you have a travel blog, you might use tags like “beach,” “adventure,” “Europe,” “budget travel,” etc., to provide additional information about the post’s content.
- Post Relationships: Tags allow you to establish relationships between posts with similar topics or attributes. When users click on a tag, they are taken to a tag archive page displaying all posts assigned to that tag.
- Tag Cloud: WordPress can generate a tag cloud widget or block that visually represents the popularity or frequency of different tags on your website. The size of the tag in the cloud indicates its usage frequency.
Best Practices:
- Use categories for broader topics or sections of your website.
- Please limit the number of categories to keep them manageable and focused.
- Assign each post to one or more relevant categories.
- Use tags for specific descriptors, keywords, or attributes related to the post’s content.
- Avoid excessive use of tags and aim for consistency in tag usage.
- Regularly review and update your categories and tags to maintain a well-organized content structure.
By adequately utilizing categories and tags in WordPress, you can improve the organization, navigation, and discoverability of your website’s content. This will make it easier for users to find relevant posts and explore related topics.
Managing Media Files

Managing media files in WordPress allows you to upload, organize, and display images, videos, audio files, and other media assets on your website.
Here’s a guide on managing media files effectively:
1. Uploading Media Files
- From the WordPress dashboard, navigate to “Media” in the sidebar menu and click “Library.”
- To upload a new media file, click on the “Add New” button at the top of the page.
- You can drag and drop files into the media library area or click the “Select Files” button to browse and select files from your computer.
- WordPress supports various file types, including images, videos, audio files, documents, etc.
- Once the file is uploaded, you’ll see it listed in the media library with details like the file name, file type, date uploaded, and file size.
2. Organizing Media Files

- Media Library: The library displays all your uploaded media files in a grid or list view.
- Search and Filter: Use the search bar or the dropdown filters to search for specific media files based on their title, file type, or date.
- Media Categories: WordPress allows you to create and assign categories to your media files for better organization. You can make new categories from the media library or assign them to files by editing them individually.
- Attachment Details: Clicking on a media file in the library opens the attachment details screen. Here, you can edit metadata like title, caption, alt text, and description for better accessibility and SEO.
3. Inserting Media into Posts and Pages
- While editing a post or page, place your cursor where you want to insert the media file.
- Click on the “Add Media” button above the editor.
- In the media library popup, select the media file you want to insert or upload a new file.
- Adjust the attachment settings, such as alignment, size, and link settings.
- Click the “Insert into post” or “Insert into page” button to add the media file to your content.
4. Editing and Deleting Media Files
- From the media library, hover over a media file and click the “Edit” button to modify its details, such as title, caption, alt text, or description.
- Select a media file from the library and click the “Delete Permanently” link to delete it. Remember that deleting a file will remove it from your server and may impact any posts or pages that use that file.
5. Media Settings
- From the WordPress dashboard, click “Settings” in the sidebar menu and click “Media.”
- Here, you can configure settings related to image sizes, thumbnail generation, and how files are organized and displayed in the media library.
By effectively managing media files in WordPress, you can organize your website’s media library, quickly find and insert media into posts or pages, and optimize metadata for better SEO and accessibility.
Review and regularly clean up your media library to remove unused or duplicate files and optimize your website’s performance.
Configuring Permalinks

Configuring permalinks in WordPress Admin/Dashboard allows you to customize the structure of your website’s URLs (Uniform Resource Locators) for individual posts, pages, and other types of content.
Permalinks are essential for search engine optimization (SEO) and user-friendly navigation.
Here’s a guide on configuring permalinks in WordPress:
1. Accessing Permalink Settings
- From the WordPress Admin/ dashboard, navigate to “Settings” in the sidebar menu and click “Permalinks.”
- This will take you to the Permalink Settings page, where you can configure the URL structure.
2. Common Permalink Structures
WordPress offers several permalink structure options.:
- Plain: This default option generates URLs with query parameters like http://example.com/?p=123. It is not recommended for SEO or user-friendly URLs.
- Day and name: This structure includes the date and post name, like http://example.com/2023/06/10/samplepost/.
- Month and name: This option is similar to the previous one but includes only the month and post name, like http://example.com/2023/06/sample-post/.
- Numeric: This structure assigns a unique number to each post, like http://example.com/archives 123.
- Post name: This structure uses only the post name, like http://example.com/sample-post/.
- Custom Structure: You can create a permalink structure using specific tags to define the format. Common tags include %year%, %monthnum%, day%, %postname%, %category%, %author%, and %post_id%. For example, /%year%/%postname%/ generates URLs like http://example.com/2023/sample-post/.
3. Customizing Permalink Structure
- Select the “Custom Structure” option to use a custom permalink structure.
- Enter the desired structure using the available tags or a combination of tags and additional text.
- WordPress automatically provides a suggested structure based on the post name option, which you can modify according to your preferences.
4. Category and Tag Base
- WordPress allows you to set a base for category and tag URLs.
- By default, category URLs appear as http://example.com/category/category-name/, and tag URLs appear as http://example.com/tag/tag-name/.
- You can customize the base text to your preference or leave it blank for no base, resulting in shorter URLs like http://example.com/category-name/ and http://example.com/tag-name/.
5. Saving Permalink Settings
- After configuring your desired permalink structure and optional category/tag base, click the “Save Changes” button to apply the settings.
- WordPress will update the permalink structure for your posts, pages, and other content accordingly.
It’s important to note that changing the permalink structure of an established website can impact existing URLs and lead to broken links.
If you have an existing site with indexed content, consider setting up proper redirects or using plugins like “Redirection” to handle redirections for old URLs to the new permalink structure.
By configuring permalinks in WordPress, you can create SEO-friendly URLs and enhance the user experience by making your website’s links more readable and memorable.
KEEP READING:
- How to Promote Your Blog Through Social Networking
- The Essential Rules of Blogging You Should Know 2024
- WordPress.com vs WordPress.org: Which is Better in 2024?
- WordPress Blogs: The Main Parts All Bloggers Should Know
- How To Make Money With Your WordPress Blog (2024)
- Ultimate WordPress SEO Guide: Optimize Your Site in 2024
- How To Get Started With WordPress: 2024 Ultimate Guides
Conclusion On WordPress Admin
So far, we have touched on all the important things available in WordPress admin. I expect you will have learned something fundamental today.
If there is something you do not understand, use the comments section to explain where you do not know so we can discuss it.
That’s all about WordPress admin; there are no miracles. It is up to you and me to continue learning more and more.
Let’s end here for today; see you in the comments.
If you liked this article, please follow us on the following Social Network:
- Find Us On Facebook
- Connect with WordPress Experts and other WordPress Users in our free Facebook Community.
- Join Us On Twitter
- Follow Us On the Telegram Group
- Find Us On the WhatsApp Channel
- Contact Us by Email: contact@thewpskill.com
- You can also reach Us by using the Contact Form.
- Also, find Our Blog Page for more tutorials.